Welcome to our short tutorial, which will guide you through some of the features of Xpert-Timer. The tour will show you the most important steps in Xpert-Timer and includes the following sections:
The start page when you launch Xpert-Timer provides an overview of all the modules used. This allows you to easily jump to the area you want to work in. It's basically your quick access to all program modules. In the configuration, you can activate the function to display the start page when you start Xpert-Timer. If you then hide the project manager, you can jump directly to the modules you want. Hide start page: If you no longer want to see the start page when the program starts, uncheck the box in the lower left corner -> "Open when program starts."
|

The Project Manager is the control center in your Xpert-Timer. Open the Project Manager via your timeline,
 or by right-clicking on your Xpert-Timer icon in the taskbar:  By default, your Xpert-Timer comes with the following areas displayed: 1.) Projects: Here you can see a list of your created projects. Numerous grouping, categorization, and filtering options are available. 2.) Tasks: This is the list of your tasks. Here, too, the grouping, categorization, and filtering options are available as in the project list. 3.) Timestamps: Here you can see the individual timestamps for your projects. Depending on the modules you have purchased, you will see a list of available windows at the bottom of your project manager. You can show or hide these windows by simply clicking on them.
|

Select the icon  Project numberAssign a name for your main project, e.g., Support, and, if necessary, a corresponding project number. If you want to assign your project numbers automatically in the future, you should only use numeric project numbers from the start. For individual project numbers, you can enter letters and numbers here. Customer assignmentTo assign a project that has not yet been assigned to a customer to a customer, right-click on the completed project and select "Assign to a customer." Then create a new customer or reverse your procedure. You can also create all customers first via customer management.  Project propertiesFirst, you must always create a main project. If this main project consists of several subprojects, you can later select "New subproject" during assignment or use the quick entry function in the project manager. The project entered via quick entry always refers to the project selected in the project manager. In our example, a subproject is now created for the main project "Phone calls" because it was selected with the mouse.  If you want to create a new main project using quick entry, check the box "Create as main project."
Information about the project in the "Description" Double-clicking on your project takes you to the "Project Properties" screen, where you can optionally enter information about the project in the "General" tab and the "Description" section. This description appears when you hover over your project in the Project Manager, or you can right-click to display the Description column in the Project Manager. 
Automatic comment entry In the "General" tab and the "Automatic comment entry" area, you can also specify whether you want to be asked automatically for timestamp comments or entries in the history. You can also enter a default text that is then entered automatically, e.g., when stopping a project. This is especially helpful if you are working on the same project for weeks.
 Select project type Select a project type in the project properties. You can also create your own project types. Project types serve as filter criteria. For example, you can display all projects with the project type "Consulting" in a specific date range. You can create your own project types in the configuration.  If you have assigned a project type in the project properties or when creating the project, you will see the corresponding icon to the left of the project name. These project types serve as filters. For example, you may only want to see projects with the "Support/Service" icon. You can print the view in the same way that you filter it. To do this, simply click on the "Print" icon. 
Project duration Next, estimate the duration of the project and enter the hours in the field provided. The start and end dates of the project are set automatically when you start or finish the project. However, you can also enter a planned date, which you can use for checking purposes later.  Except for the project name, all project details are optional. So if you want to get started with the program quickly, enter a project name and click "Save." BillingUnder the "General" tab in the project properties, you can choose from three billing options.  Do not bill: You are working on a project that is not to be billed to the customer, nor is it to be included in the internal calculation of project times. This could be your lunch break or private phone calls, for example. Internal calculation only: This is a project that is not included in the time calculation for the customer (for their invoice), but is only to be calculated internally. This could be a "Support" sub-project, for example, which the customer has already paid for with the purchase price of software. Nevertheless, you want to calculate how much time you spend on support for the customer and how much time (internal costs) this takes. Charge: If you want to calculate your project times using both internal and external cost rates, select this option.
In the "Billing" tab, you can specify the billing type and billing rate for the project, which can then also be charged to the customer. The calculated price will then appear in your timestamp list in the "Price" column. Save your settings. 
 |
||
|

As soon as you press the green "Play" button, the time for the project starts running. You can see the currently running project on the timeline. Depending on how the display is set in the configuration, it shows the project name, time already recorded, countdown, costs, and the total working time already recorded. If you move the mouse over the areas of the timeline, details will be displayed.  If you right-click on the time in the timeline, you will see various time details that may be of interest to you. If you right-click in other areas of the timeline, you will also see context menus. If the timeline is bothering you, you can hold down the Ctrl key and move your mouse over the timeline. It will disappear for 5 seconds. Another option is to use the configuration to hide the timeline automatically. Then it will disappear as soon as you move your mouse over it. You can customize your timeline in the Xpert-Timer configuration. |
![]() Keyboard shortcuts help save time
Keyboard shortcuts help save time
Now that you have created your main and subprojects, it's time to make working with Xpert-Timer easier. Keyboard shortcuts make it easier to switch between projects and call up functions.  Right-click on a project and select the "Set quick access" menu item to assign a key combination for the respective project. Under the icon Under Keyboard Shortcuts, you can see how to customize your keyboard shortcuts in the program.
|
||||
 , you can select the desired key combination for creating keyboard shortcuts under the
 You can optionally display your timestamps in the project manager. These will then appear in a list.  The narrow green bars to the left of the timestamp show the relationship between the end time of the last stamp and the start of the new stamp. If the recording is complete, a continuous green bar appears. If there are gaps, such as on Sunday, August 16, between 1:28 p.m. and 9:49 p.m., there is no green bar next to the timestamp. If some timestamps overlap, they are displayed with a red bar. 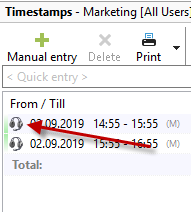 Right-clicking on a timestamp brings up the following menu: 
Here you can also edit your timestamps retrospectively. If you want to combine several timestamps or split a timestamp, you can also do this here. Please note that the timestamps you want to combine must all belong to the same project and be contiguous in terms of time. When splitting the timestamp, you can specify at what point in time the stamp should be split. Please read more details in the "Timestamps" chapter. If necessary, you can change the billing status of the time stamp. If, for example, you do not want to bill a time stamp, change the status here to "not billable." Print timestampYou can show or hide columns in your project list for your report. To do this, right-click on a column. All columns that you show will be printed on your report. 
You can save your selected filters and grouping settings, as well as the columns displayed, via the menu item Load/Save View Settings.  |
To track the progress of your project, we recommend creating comments for your timestamps. By default, these are displayed below your project list in the Project Manager. In the View menu item, you can also display the timestamps to the right of your projects. In the project properties (double-click on the respective project), you can specify that you are automatically asked for the timestamp comment as soon as you start another project or stop a project, for example. If you want to keep other employees up to date on the status of the project, you have the option of informing them about the project progress by email. You can send the email using the "Send email report" button on the timeline.
 If you click in the comment field of the timestamp, you can edit it with F2. With Ctrl+C, you can copy comments and then paste them into several other selected timestamps with Ctrl+V. By right-clicking on the comment field, you can also insert free text or an existing text module.

You can, of course, print the timestamps if required. You can also group the timestamps by date or project. You can also right-click on the column header to show or hide columns and thus customize your report. |
To track the progress of your project, it is recommended that you create an activity history. However, you should decide whether to use the activity history or the comments on the timestamps. The entries in the activity history are not linked to timestamps. It is therefore intended to document the progress of the project, but not to record the activities of individual timestamps. Click on the "History" tab in the project properties. Here you can create an entry for the project at any time. In the project properties, you can specify whether you want to be asked automatically for the history entry or the timestamp comment as soon as you start another project or stop a project. You can also control the entry centrally in the configuration. To do this, select "From configuration setting (user)" in the project properties. The setting is saved and applied when new projects are created.  If you want to keep other employees informed about the status of the project, you have the option of notifying them of the project progress by email. The settings for this can be found in the project properties in the "More" tab. You can, of course, print out the history if required.
 |
![]() Creating new tasks in the task list
Creating new tasks in the task list

To create a new task, first select the project for which you want to create a new task. Then click on the green "plus" sign and assign a name to the task. This "subject" will also be displayed in your task list. The ID for the task is assigned automatically. It is used to easily reference a specific task in a meeting and cannot be changed. You must assign each new task to a specific project.  The priority of tasks ranges from Lowest to Immediate. For the priority "Immediate," the fields "Due on" and "Starts on" are irrelevant, since the task is due immediately. 
Enter the person who is to process the task as the processor. You can also enter part of the name and press "Enter" on your keyboard. Xpert-Timer will then automatically select the appropriate employee. To better sort your tasks, you can divide them into categories. You can define these categories yourself in the Xpert-Timer configuration. In the task list, you can then filter or group your tasks according to these categories. 
A due date is required if the task should be completed by a specific time. Optionally, you can estimate the duration of the task. If necessary, you can display and print the "Required" column in your task list. Finally, enter a detailed description of your task. You can also use text modules, which you can also define in the configuration. Right-clicking in the text area gives you additional options, e.g., to insert the user name, date, or time.  To automatically set a task to "In progress" status, select "Start task." The subject of the task is also automatically written to the timestamp and the task time is started.  You can also move your tasks in the task list at any time using drag & drop. Simply select a task with the mouse and drag it to another category or project. 
Completed tasks can also be reopened later. To do this, select the corresponding task and right-click to open the context menu. Then click on "Edit" and use the "Reopen" button.  For more information on the task list, see the chapter "Task List." |