You have the option of importing timestamps into your Xpert Timer. To do this, the timestamp data records must be in CSV format.
CSV stands for "Character Separated Values" and means that the values in a list are separated by delimiters (typically semicolons or tabs). For optimal import results, individual values should be enclosed in single or double quotation marks, unless they are purely numerical values.
Here is an example of a .csv file:
FROM;TO;MINUTES;BREAK;COMMENT;EMPLOYEE;CUSTOMER;CUSTOMER NUMBER;MAIN PROJECT;MAIN PROJECT NUMBER;PROJECT;PROJECT NUMBER
"12-02-2020 08:00";"12-02-2020 09:00";60;0;"Comment on timestamp";"Dieter Demo";"Customer LLC";1;"Main project 1";"1";"Subproject 1";"1001"
"12-02-2020 10:00";"12-02-2020 12:00";120;0;"Additional comment on timestamp";"Dieter Demo";"Kunden GmbH";1;"Main project 2";"2";"Subproject 1";"2001"
"10-02-2020 09:00";"10-02-2020 09:30";30;0;"Additional comment on timestamp";"Dieter Demo";"Customers Inc.";2;"Project 1";"3";;
Required fields are "From, To, Employee, Project, Project Number."
You can also save Excel files in CSV format. The respective column headers must then match the database fields.
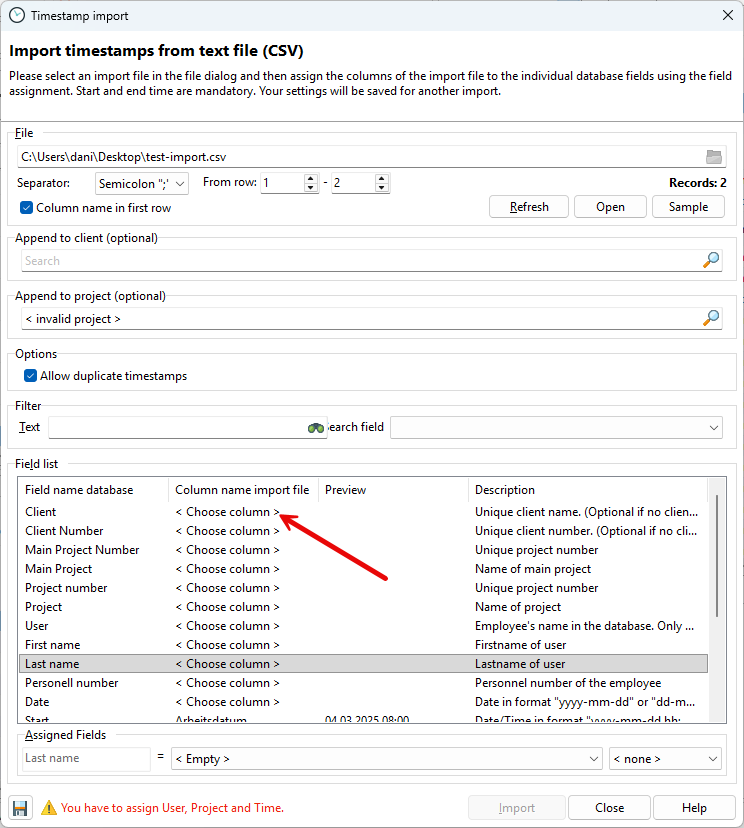
Then import the file using the Timestamp Import dialog and assign a column name from the CSV file to the required fields. The easiest way to do this is to right-click on the corresponding field. This opens a selection field for all column names contained in the CSV file.
The import then proceeds as follows:
1.Find/create customer: The system checks whether a customer with the customer number already exists in the database. If not, it checks whether there is a customer with the corresponding name. If no customer is found, one is created.
2.Find/create project. The same procedure is followed for main projects and subprojects.
3.Find/create employee: The employee name can be, for example, the user's login name, but also the full name with first and last name. If the import file does not contain separate fields for first and last names, the "Copy Word" field function can be used. This allows parts of the field content to be cut out at specific word boundaries. In this example, the first name is taken from the first word, with a space as the separator. The second word is then taken as the last name.
4.Find/create timestamp
a.Timestamp start/end: The timestamp consists of a start and end time, which can be in the formats "yyyy-mm-dd hh:mm" or "dd-mm-yyyy hh:mm".
If the "Date" field is used, the "From" and "To" fields only contain the time in the format "hh:mm". Any seconds are truncated.
b.Comment: The comment can contain a line break. Since the corresponding control character (CRLF or #13#10) cannot be displayed in a text file, the abbreviations "\r" and "\n" are replaced with the line break character during import.
c.If a timestamp is found in the database that matches the "From/To/Employee" fields, it is updated. Otherwise, the timestamp is created anew.
Tips and hints:
•You can also import timestamps without customer/project references using the "Attach to customer" and "Attach to project" selection fields.
•Using the "Copy word" field function, you can also create a customer/project reference from the comment, if it has been entered consistently in the correct format, e.g., "Customer number-project number: comment text." The customer and project can then be extracted using the separators "-" and ":".
•You can use the "Example" button to create a sample CSV file to familiarize yourself with the file structure.
The sample import then results in the following project structure in the Project Manager:
